
Sapphire v5 for AE 基本情報
What's New in This Version これまでの改良履歴
改定履歴は、Ver2が出ているため訳してもあまり意味がないため訳しませんでした。The following are new since version 1.0. バージョン1.0から最新バージョンまで。
New in 1.01:
- On Digital Fusion, an issue with network rendering has been fixed.
- On After Effects 6.0 or greater, duplicate copies of angle parameters in the timeline have been removed.
- A problem on workstations with no ethernet ID has been fixed.
- Some performance improvements on Mac.
- A problem on Windows for users without admin privileges has been fixed.
- A problem with saving workspaces from combustion's Render Queue has been fixed.
- On Mac, an issue with disabled ethernets and a problem with the install-ae-custom utility have been fixed.
- The render speed of RackDefocus is improved.
- For AE on Windows, a problem with hyper-threading is fixed that was related to drag-and-drop failures.
- Network rendering between Mac and Windows machines should now work.
- An issue with alternate layer inputs with different dimensions has been fixed.
- On Premiere Pro 1.5, support for field based media is improved.
- Support for Apple Motion is improved.
- Free network rendering is improved, including a workaround for GridIron.
- An issue with temporal effects combined with certain other effects is fixed.
- On Windows with Hyper-Threading, rendering speed is improved for many effects.
- An issue with Expand Borders and Soft Borders parameters is corrected.
- Mac OS X Tiger (10.4) is supported.
- On Windows, an issue with licensing and wifi devices is resolved.
- 32 bit host applications on Windows64 are now supported.
- On Mac, serial number installation is simplified when using an http proxy server.
- In 1.061, an issue with licensing and multiple Ethernet devices is fixed.
- In 1.062 on Mac, an issue with Point params in Motion 2 is worked around.
- Network rendering on Combustion 4 is supported.
- The Windows installer finds eyeon Fusion 5.
- In 1.071, a problem with all-zero machine IDs is fixed.
- Final Cut Pro 5.1 and Combustion 4 on Intel Macs are supported. The Mac installer now includes both CFM plug-ins for older host products, and Universal plug-ins for newer host products on PPC and all universal hosts on Intel Macs.
- An issue with FCP quitting on certain quad G5s is fixed.
- AutoPaint is improved when used with tall aspect ratio images.
- The Windows installer finds eyeon Fusion 5 render nodes.
- In 1.082, out-of-memory handling is improved and an issue with quad core machines is fixed.
- In 1.083 an installation issue with Final Cut Pro HD (versions 4.5 and earlier) is corrected, and Pie FX for Chyron is supported.
- In 1.09 on Windows, Pie Fx support is improved, support for Windows systems with multiple Ethernets is improved, and a problem is corrected when using Sapphire as a different user than the one who installed the software.
- In 1.10, a problem with network rendering in 1.09 is fixed, an issue with S_FilmEffect with 3:2 stutter after another plug-in is fixed, and the Windows installer finds Eyeon Fusion 5.1.
Loading a Plug-in プラグインの適用
Once Sapphire Plug-ins have been installed and the host application has been restarted, the new plug-ins should appear in the host
application's effects menu just like any other effects.
To load a plug-in in Adobe After Effects, go to the Effects menu and open one of the Sapphire folders.
You can double click on an effect to insert it into your current layer's effects, or drag it onto the desired location in your current layer.
To load a plug-in in Final Cut Pro, go to the Effects tab in the browser, open the Video Filters folder, open one of the Sapphire folders, and drag the plug-in onto one of your clips.
Then to view and adjust the plug-in parameters, double-click on the clip, and select the Filters tab in the viewer.
To load a plug-in in Combustion, select the layer in your Workspace that you want to apply the effect to, open the Operators menu, and select a plug-infrom one of the Sapphire folders.
ホストアプリケーションにインストールされたSapphireプラグインは、他のエフェクトと同様にエフェクトメニューの中に登録されます。(この場合、After Effectsにインストールしたことになります)
After Effectsでプラグインを適用するには、エフェクトメニューからSapphireフォルダを開きます。あなたの選んだエフェクトをダブルクリックして、現在のレイヤーにエフェクトを適用します。
または、現在のレイヤーにドラッグして適用することも出来ますFinal Cut Proでエフェクトを適用するには、ブラウザー内のエフェクトタブを選択します。
次にビデオフィルタフォルダーの中にあるSapphireフォルダを開きエフェクトを適用したいクリップにドラッグ&ドロップします。
プラグインのパラメータを調整するには、エフェクトを適用したクリップをダブルクリックすることでビューアーの中にあるフィルタタブにSapphireのパラメータが出現し調整できるようになります。Conbustionでエフェクトを適用するには、あなたがエフェクトを適用したいワークスペースでレイヤーを選択し、オペレータメニューを開き、Sapphireフォルダからプラグインを選びます。(Combustionは使用していないのでご了承ください)
Resetting Parameters to Defaults パラメータをリセットしデフォルトに戻すには
In Adobe products, you can reset all of a plug-in's parameters to their default values by clicking on the Reset button just to the right of the plug-in name in your layer editor.
Individual parameters can also be reset to their default values from the Effect Controls editor by right-clicking on the parameter and then selecting Reset.
In Final Cut Pro, reset is performed by the red "X" button.
In Combustion, the Reset button is to the right of the parameters under the small feedback image.
アドビの商品では、プラグインの設定をすべて初期設定にするには、現在のレイヤーに乗せているプラグインの名前の右側にあるリセットボタンを押してください。個別のパラメータはEffect Controlsから右クリックでResetを選び、デフォルトに戻すことが可能です。
Final Cut Proでは赤いXボタンでリセットできます。Combustionでは、小さなフィードバックイメージの下にパラメータのリセットボタンがあります。(Combustionは使用していないのでご了承ください)
Online Documentation オンラインドキュメント
In Adobe After Effects, all Sapphire Plug-ins include an Aboutbutton to the right of the plug-in name.
Push this button to bring up a window showing the current version of Sapphire Plug-ins, your license status, some documentation about the current plug-in, and links to more detailed HTML documention.
In Final Cut Pro, the About button is just above the parameter sliders.
In Combustion, the About button is to the right of the parameters under the thumbnail image.
Online documentation is normally installed along with your software and can also be accessed directly.On Windows go to Start -> All Programs -> GenArts Sapphire AE -> Online Help (HTML) or (PDF). On Mac, go to the Applications/GenArtsSapphireAE folder and double click on Online Help.html or .pdf.
Adobe After Effectsでは、すべてのSapphireプラグインに、Aboutボタンがエフェクトネームの右上についています。このボタンを押すと、現在あなたが使用しているバージョンのウィンドウが開き、あなたのライセンス表示と現在のエフェクトのドキュメントを見ることが出来ます。更にヘルプなどの詳細についてはHTMLファイルにリンクしています。Final Cut Proでは、Aboutボタンはパラメータスライダの上についています。Combustionでは、Aboutボタンはサムネール下のパラメータの右にあります。オンラインドキュメントは、一般的に、Sapphireがインストールされた場所に入っており、直接アクセスすることが出来ます。
Windowsでは、スタート>すべてのプログラム>GenArtsSapphireAE>OnlineHelp or PDFを選択してください。
MACでは、アプリケーション>GenArtsSapphireAEフォルダに行き、ダブルクリックしってオンラインヘルプを表示してください。
About Matte Inputs マットの入力について
Many Sapphire Plug-ins accept an optional Matte input clip. Typically, this input can be used to provide more detailed control for where the effect should be applied and where it should not be applied.
Glint, Glow, Glare, and Rays, for example, take the main Source input and also an optional Matte input.
For these, the source input is multiplied by the matte before generating the glints (or glows, glares), so where the matte is black no glints are generated,and where it is white they are generated as usual.
This method prevents the glints or glows themselves from being partially cropped by the matte.
In addition these effects use the RGB colors of the Matte input to selectively colorize the resulting glows, glints, or glares.
The red areas of the matte will produce red glows, glints, or glares, and so on.
In Blur effects, the areas which are matted out are never blurred, so they do not blur into the matted-in regions.
If a matte were instead applied afterward, the pixels behind the matte would be blurred over the edge of the matte and into the final image.
As an example, say you have a clip with white text over a black background. If you put that clip into both the Source and Matte inputs of Blur, the black background will not be blurred into the text, since the black pixels are all matted out.
For a few compositing effects, Layer, DropShadow, EdgeFlash, MatteOpsComp,and RackDfComp, the Matte input instead indicates the opacity of the foreground clip.
This can be used to give the plug-in different opacity values than the usual alpha channel of the main foreground input.
Sapphireプラグインの多くは、オプションとしてマットクリップを入力することができます。通常、エフェクトを適用したこの入力は、より細かな調整を可能とします。また、使わないままにしておくこともできます。例えば、Glint, Glow, Glare,and Rays, はメインのソースとマットのソースを入力します。Glintエフェクターの場合にはマットの白い部分にエフェクトが適用され、マットの黒い部分には適用されません。これらは、ソースはマットで分離され、glints (or glows, glares)のエフェクトがかかる部分とそうでない部分に分けられます。一般的に、マットの黒い部分はエフェクトがかからず、白い部分のみにエフェクトがかかります。この方法は、エフェクトをかける部分を各エフェクター自身でマスクして制限することが出来ることを示しています。さらに、これらのエフェクターは、RGBの色情報を使ってエフェクトを適用させることも出来ます。例えば赤をマスクとして使って赤みのかかったエフェクトをかけることも可能です。Blurエフェクトでは、ブラーを掛けたくないエリアを指定することも出来ます。(マットにより範囲を指定してエフェクトのかかる部分を制限することが出来る)もし、マットが後に変更された場合、マットの影響を受けるピクセルは、マットの輪郭でブラーがかかり、それが最終的なイメージとなります。例えば、白文字を黒バックにのせたクリップを準備してください。(適当な名前をつけてください。この場合TESTとします。)そのクリップをBlurエフェクトを適用したソースクリップのMatteドロップダウンリストから上記で命名したTESTを選択すると、白文字の部分にBlurがかかり、黒の部分にはBlurがかかりません。また、いくつかの合成系エフェクトであるLayer,DropShadow,EdgeFlash,
MatteOpsComp,RackDfCompは、Matteドロップダウンリストで選んだ表示に関わらず、フォアグランドのクリップの透明度などを変更出来ます。これは、アルファチャンネルの透明度とは別にフォアグランドの透明度を設定することが出来るというメリットが挙げられます。
About Alpha Channel Processing アルファチャンネルの処理について
All Sapphire Plug-ins can handle RGBA inputs, and the Alpha of RGBA inputs is handled in one of three ways, depending on the effect:
- Alpha is processed as just another input channel like R, G, and B. Effects in this category include: AutoPaint, Mosaic, Blur,BlurMotion, RackDefocus, all Wipes, all Dissolves, Distort, DistortBlur,DistortChroma, all Kaleidoscopes, all Warps, Shake, and MathOps.
-
Alpha is copied from the first input to the output.
In this case the effect doesn't use the Alpha channel, but it is passed through unchanged from the first input to the output. Effects in this category include: BandPass, BlurChroma, ClampChroma, DuoTone, EdgeDetect, Embosses, Etching, HalfTones, Hotspots, DistortRGB, Monochrome, Pseudo_Color, Psykos, Sharpen, Sketch, Sparkles, Streaks, Threshold, and Zebrafy. -
Some other effects pass the input Alpha channel through, and also add some opacity where the effects are applied.
An Affect Alpha parameter is included in these effects which allows adjusting the amount that the alpha channel is affected. The effects in this category are: LensFlare, all Glows, all Glints, Glare, EdgeRays, Rays, and all Zaps.
Most Sapphire Plug-ins include a Opacity parameter that also affects how alpha is processed.
Normal Opacity indicates that the input images are "non-premultipled" or "straight" format which is typical for After Effects.
If the Opacity parameter is set to All Opaque, the input alpha is ignored (it's treated as if it were fully opaque), and the output alpha is set to 1.
This option is slightly faster, and is appropriate if your images should be fully opaque.
The Opacity parameter can also be set to AsPremult to indicate the input clips are in "premultiplied" format.
In this case the RGB values of input images are assumed to be already scaled by their Alpha (opacity) values, and the output images are also generated in this format.
This option is less commonly useful, but may be appropriate if the transfer mode of your layer is set to Luminescent Premult.
A few plug-ins such as the Clouds and Texture generators include both an Input Opacity and an Output Opacity parameter.
The Input Opacity gives the Normal, All Opaque or AsPremult options as described above, and the Output Opacity allows selecting between copying the opacity directly from the input, or setting the output to all opaque.
すべてのSapphireプラグインは、RGBA(アルファチャンネルのついた素材)を扱うことが出来ます。そして、RGBA素材のアルファチャンネルは、3種類の内1つの方法で、エフェクトが掛けられます。
- アルファは、他のR、G、Bチャンネルと同じように処理されます。
このカテゴリーに含まれるエフェクトは、AutoPaint, Mosaic, Blur, BlurMotion, RackDefocus,all Wipes, all Dissolves, Distort, DistortBlur, DistortChroma, all Kaleidoscopes, all Warps, Shake, and MathOpsです。 - アルファは、エフェクトを適用した状態でそのまま最後の出力までの維持されます。
しかし、アルファチャンネルを使用しないような場合エフェクトを適用せずそのまま出力します。
そのようなカテゴリーに分類されるのは以下のとおりです。
BandPass, BlurChroma, ClampChroma, DuoTone, EdgeDetect, Embosses, Etching, HalfTones, Hotspots, DistortRGB, Monochrome, Pseudo_Color, Psykos, Sharpen, Sketch, Sparkles, Streaks, Threshold, and Zebrafy. - 他のいくつかのエフェクトは、アルファチャンネルをスルーして、エフェクトが適用されている不透明度を加えます。
適用したアルファのパラメータは、これらのエフェクト(調整したアルファチャンネル)を含んでいます。
このカテゴリーに含まれるエフェクトは、LensFlare, all Glows, all Glints, Glare, EdgeRays, Rays, and all Zaps.です
不透明度のパラメータを持っているほとんどのSapphireプラグインは、何らかの方法でアルファチャンネルが処理されてエフェクトを適用します。
代表例としてAfter Effectsの場合では、入力された映像の標準の不透明度は、non-premultipled(ノンプレマルチ)かstraight(ストレート)フォーマットで表示されます。
もし、不透明度のパラメータが、All Opaque(すべて表示)にセットされている場合、そこに入力したアルファチャンネル付き素材のアルファの部分は無視されます。
そして、その出力はアルファを1にしたのと同じ効果で、背景も含めてエフェクトがかかった状態になります。(アルファの設定値は0から1まで。0なら黒、1なら白になります)このオプションは、少し処理が早くなります。
そして、あなたが、不透明度なしでイメージを確認したいときに便利です。
Opacityパラメータは、AsPremultというPremultipliedで表示する方法もあります。
この場合、入力されたイメージのBGBの濃度は、既に入力されたイメージが元々持っているアルファの透明度によって合成されています。
このオプションは、もし、あなたがレイヤーに描画モードで輝度を設定していたら、機能しません。
CloudsやTextureのような、いくつかのプラグインは、Input Opacity と Output Opacityの二つのパラメータを持っています。
Input OpacityはNormal、 All Opaque 、 AsPremultを設定できます、Output OpacityはInputで設定した状態をそのまま表示し、copying the opacityとall opaqueを選ぶことが出来ます。
補足:
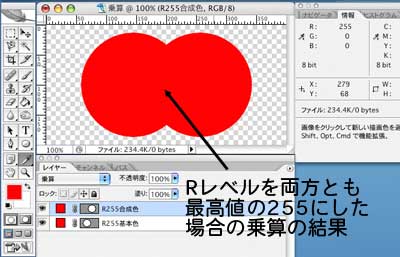
PreMultipliedとは、「事前に掛け算をする」という意味で、この場合、掛け算とは、AEやPSの描画モードにある乗算と同じ意味です。乗算とは、基本色と合成色を乗算するということです。
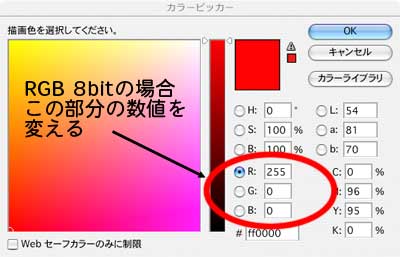
2つの色を掛け合わせるというのは、RGB 8bitの場合、256段階の階調(0~255)がありますが、この階調を掛け算するということです。しかし、RGB 8bitの場合、256を超えることはできないため、乗算の場合、基本色と合成色を掛け算してから256で割り算をします。
計算式:(基本色の色レベル×合成色の色レベル)÷255
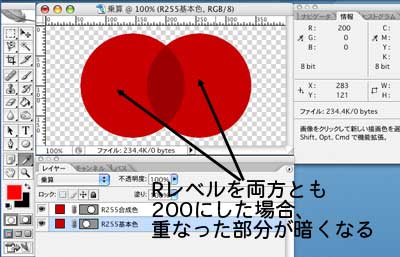
次に、両方のレベルが200になったらどうなるでしょう?結果はご覧の通り。重ね合わせた部分が暗くなっています。計算すると答えは156.8627になるはずです。
計算式:(200×200)÷255=156.8627
PSのスポイトツールで重なりの部分の色レベルを測定すると小数点以下が端数処理されて157と表示されるはずです。
そこでPreMultipliedとは、何かという疑問にぶち当たります。なぜ、乗算を事前に行うかというと、合成しようとするクリップにアルファチャンネルが含まれていて、しかも、そのクリップに半透明の部分(白~黒へのグラデーションがかかっている)がある素材の場合、それをレンダリングするのに時間がかるため、グラデーションのかかっている部分を無視して作業効率を高めようとする機能がPreMultipliedということになります。もう一度おさらいをするとmultipliedというのは色相、彩度のみに影響するので、事前にmultipliedすることで、白から黒の明度の変化は無視し、作業効率を高めることを意味します。
About Angle Parameters 角度のパラメータについて
Many Sapphire Plug-ins include parameters that adjust angles.These parameters are in degrees, so 180 is half a revolution and 90 is a quarter, etc. On AE, Premiere, FCP, and Combustion, a positive change in the parameter value corresponds to a clockwise rotation.In Digital Fusion, however, a positive change is a counter-clockwise rotation.This makes the behavior of the plug-in angles consistent with typical angles in each host application. The values, including the default values, are negative on Digital Fusion relative to the other host applications.In AE, Premiere, and FCP, there is an option to use dials rather than sliders for angle parameters.This allows you to turn the parameter value around in the user interface in a way that corresponds to the actual rotation.In Digital Fusion, there is an option to use treadmills for angle parameters, with on-screen user interface widgets which can be dragged to rotate them in the image display area.Some users prefer these rotating dial options, while others prefer the usual parameter sliders.Variables are provided in the Sapphire Plug-ins s_config.text file that allow each user to set their own preferences.You can independently indicate if you want dials on FCP,Digital Fusion, and/or AE and other applications that might support them.By default, Digital Fusion uses the dials option, and other host applications use sliders.See the section below on Customizing Plug-ins for information on how to edit this config file and change these options.For a new dial preference to take effect on FCP, you also need to delete the "Final Cut Pro POA Cache" in Library/Preferences/Final Cut Pro User Data in your home directory.
多くのSapphireプラグインには角度を調整するパラメータがあります。これらのパラメータは度数表示(ラジアン表示ではありません)で180で半分、90で1/4の角度を示します。AfterEffectsやFinalCutPro、Combustionでは、順方向にパラメータを変化させると時計方向に回転します。Digital Fusionでは、順方向に動かすと半時計方向に回転します。これは、アプリケーションごとに角度の調整方法が異なるため、それにあわせて角度が調整できるようにしています。デフォルトの数値を含む設定値は、他のホストアプリケーションと比べ、Digital Fusionのみ反対になっています。AE、Premiere、FCPでは、スライダー式角度調整よりもダイヤル式調整の方が便利でしょう。回転用のパラメータは、実際の回転と連動するので使いやすいでしょう。Digital Fusionでは、画面にウイジットを表示して、ベルトコンベア式の角度調整をドラッグして使います。いくつかのプラグインは好みに合わせて使いやすいスライダを持っています。s_config.textファイルに、Sapphireの設定値を記述しておくことが出来ますきます。もし、FCPやDigital Fusion、AEなど他のアプリケーションで、上記設定をサポートするなら、それぞれのアプリケーションごとに設定することが出来ます。デフォルトでは、Digital Fusionはダイヤルオプションを使用し、他のホストアプリケーションでは、スライダーを使うというような設定も可能です。s config fileや、オプションの変更方法は、プラグインのカスタマイズを参照してください。新規に作成したダイヤルの設定をFCPで使用するには、あなたのホームディレクトリにある、"Final Cut Pro POA Cache"を削除する必要があります。(ライブラリー/プリファレンス/Final Cut Pro ユーザーデータ)
About Pixel Aspect Ratios ピクセルアスペクトレシオについて
For some image formats, the digital form of the image is scaled non-uniformly to produce the final viewed picture.
For example NTSC resolution is normally 720x486 with an aspect ratio of 1.481.
However, the final NTSC picture has an aspect ratio of 1.333. Thus the original digital image is scaled in the horizontal direction by a factor of 0.9 and shapes rendered as circles can end up squashed slightly into ovals. The original pixels are effectively rectangular shaped instead of squares, and have an aspect ratio of 1.481/1.333 = 1.111. (Or 1.333/1.481 = 0.9 if the inverse ratio is used.)
After Effects allows you to adjust the pixel aspect ratio in the Composition Settings menu, and Sapphire Plug-ins read this value to give the appropriately scaled results.
If necessary, you can override the pixel aspect ratio for allSapphire Plug-ins by changing the value of force_pixel_aspect_ratio in the s_config.text file.
The pixel aspect ratio makes no difference for basic pixel processing effects such as color processing or compositing.
デジタルの画像フォーマットでは、最終出力のサイズが正方形でないものがあります。
例えば、NTSCでは、720x486解像度で、1.481のアスペクト比になっています。しかしながら、最終出力のNTSCでは、アスペクト比が1.333になっています。
(補足すると、4:3の画面で後述する真円が正常な形で表示されるとするとその画面の横縦比は4÷3=1.333になるということです。)
このように、オリジナルのデジタル画像は、横方向に0.9倍に圧縮され、円形の画像は卵のような形で表示されます。補足すると0.9倍という数値は、前述した、1.333÷1.481=0.9から算出されています。
オリジナルのピクセルは、正方形から長方形に変形させられ、アスペクト比が、1.481÷1.333=1.111になります。(もしくは1.333÷1.481=0.9と逆に計算しても、縦と横の計算する順番を変えただけで内容的には同じことです。)
After Effectsは、ピクセルアスペクト比をコンポジションの設定で適正化しますが、Sapphireでもこの設定を読み込んで適切な比率に設定します。
もし、必要があれば、s_config.textのthe value of force_pixel_aspect_ratioの設定を書き換えることで変更することが出来ます。
ピクセル比の違いは、基本的なピクセル合成処理であるカラー調整系や合成系のエフェクトに影響を及ぼしません。
Customizing Plug-ins プラグインのカスタマイズ
A number of parameters are available that can be adjusted to customize the behavior of all Sapphire plug-ins.
You can disable multi-processing, choose to use dials for angle parameters, force the pixel aspect ratio, or specify lookup tables for more accurate processing of log format images.
A facility is also included with Sapphire Plug-ins that allows users with some programming experience to define and customize new plug-ins.
For additional information on these, or to modify a parameter, see the s_config.text file.
On Mac the config file is located at /Applications/GenArtsSapphireAE/config/s_config.text
On Windows the config file is located at C:\Program Files\GenArts\SapphireAE\s_config.text.
Custom Lens Flare types can also be made by editing the s_lensflares.text file, in the same directory as the config file above.
New flare types will automatically appear in the menu of the S_LensFlare plug-in.
パラメータの数値はすべてのSapphireプラグインの動作でカスタマイズすることが出来ます。
マルチプロセスを不能にしたり、角度パラメータをダイヤル式にしたり、ピクセルアスペクト比を反映させたり、ログフォーマットイメージのより正確な処理のために、ルックアップテーブルを指定することが出来ます。
Saphhireプラグインの優れた点として、いくらかのプログラミングの経験があれば、新しいプラグインをカスタマイズすることも出来ます。
追加情報としてパラメータの変更は、s_config.txtファイルを参照してください。
Macでは、アプリケーション>GenArtsSapphireAE>config>s_config.txt にあります。
Windowsでは、c:\Program Files\GenArtsSapphireAE\s_config.text にあります。
Custom Lens Flare もまた作成することが出来、 同じディレクトリーの configファイルの上に s_lensflares.text ファイルにあります。
新しいフレアータイプは、自動的にS_LensFlareのメニューに現れます。
Known Problems 既知の問題
- Alternate "layer" (or "well") parameters allow plug-ins to access other unprocessed layers, but can not get the layer as processed by other effects. This appears to be true on both AE 6.5 and FCP 4. A PreComp is needed to achieve this.
- The Feedback and Trails effects sometimes do not render correctly unless the cache is cleared first.
These effects must also render frames in sequential order. - On FCP, alternate "well" input clips are often not accessed at the correct time. Their positions on the timeline are ignored, and they are also sometimes accessed at half speed. Hopefully this will be fixed in a future version of FCP.
- On FCP, push buttons do not work, such as the Set Hold Level button in the Flicker Remove effect.
They do not appear at all in FCP, and you need to adjust the Hold Level manually instead. - On FCP, parameter value ranges are often more limited than the min/max values shown in the documentation.
This is because FCP ignores the absolute limits specified by the plug-in. It does not allow type-in values to exceed the default slider limits, and does not provide a way for the user to adjust the slider limits, as AE does. - On After Effects 6, adjusting parameter values by directly dragging on the number with small ranges is often too sensitive.
This is because AE 6 sets the sensitivity automatically using the valid range of the parameter, and does not adapt to small slider ranges correctly. This is much improved in AE 6.5. - On After Effects, temporal effects that require frames from other times should be applied directly to a clip, and not over another effect.
A plug-in can't access alternate frames from the output of another effect. Workarounds are to either apply the temporal effect first, or use a precomp and apply the temporal effect to that.
- On Premiere Pro 1.0, most parameter values measured in screen pixels that are not xy points are incorrect in Draft Quality, and temporarily incorrect while dragging in Automatic Quality. However, they should be correct in the final full resolution render.
Hopefully this will be fixed in a future version of Premiere Pro.
© 2007, GenArts, Inc. All rights reserved.