S_TextureNoisePaint

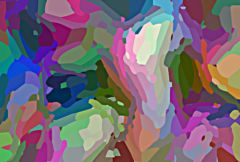
Creates an abstract texture by applying an AutoPaint effect to a procedurally generated noise texture.

In the Sapphire Render effects submenu.


Inputs:

Background:  The current layer.   The clip to combine the texture image with. This may be ignored if the Combine option is set to Texture Only.
        

Parameters:

Noise Frequency:   Default: 5,  Range: 0.1 or greater.
The spatial frequency of the initial noise texture. Increase to zoom out, decrease to zoom in.

Noise Freq Rel X:   Default: 1,  Range: 0.01 or greater.
The relative horizontal frequency of the initial noise texture. Increase to stretch it vertically or decrease to stretch it horizontally.

Noise Octaves:   Integer,  Default: 1,  Range: 1 to 10.
The number of summed layers of noise. Each octave is twice the frequency and half the amplitude of the previous. A single octave gives a smooth texture. Adding octaves makes the result approach a fractal (1/f) noise texture.

Noise Seed:   Default: 0.23,  Range: 0 or greater.
Used to initialize the random number generator. The actual seed value is not significant, but different seeds give different results and the same value should give a repeatable result.

Noise Shift:   X & Y,   Default: [0 0],  Range: any.
Translation offset of the initial noise texture.

Stroke Frequency:   Default: 30,  Range: 0.1 or greater.
The density of brush strokes in the frame. Increase for smaller strokes.

Stroke Length:   Default: -5,  Range: any.
Determines the length of the brush strokes along the directions of edges in the source clip. If this is negative the strokes will align perpendicular to the edges for a 'HairyPaint' style.

Stroke Align:   Default: 0,  Range: 0 or greater.
Increase to smooth out the directions of the strokes so nearby strokes are more parallel.

Sharpen:   Default: 2,  Range: any.
The amount of post-process sharpening applied.

Sharpen Width:   Default: 0.1,  Range: 0 or greater.
The width at which to apply the post-process sharpening filter, relative to the stroke sizes. Higher values affect wider areas from the edges, lower values only affect areas near sharp edges.

Jitter Frames:   Integer,  Default: 0,  Range: 0 or greater.
If this is 0, the locations of the strokes will remain the same for every frame processed. If it is 1, the locations of the stokes are re-randomized for each frame. If it is 2, they are re-randomized every second frame, and so on.

Brightness:   Default: 1,  Range: 0 or greater.
Scales the brightness of the result.

Color:   Default rgb: [1 1 1].
Scales the color of the result. For example, if it is yellow [1 1 0], the blue of the result will be 0.

Saturation:   Default: 0.8,  Range: 0 to 10.
Scales the color saturation. Increase for more intense colors. Set to 0 for monochrome.

Offset:   Default: 0,  Range: -8 to 2.
Adds this gray value to the result (or subtracts if negative). 0 has no effect, .5 is middle gray, and 1 is white.

Bg Brightness:   Default: 1,  Range: 0 or greater.
The background brightness is scaled by this value before being combined with the texture.

Combine:   Popup menu,  Default: Texture Only.
Determines how the texture is combined with the Background.
Texture Only:  gives only the texture image with no Background.
Mult:  the texture is multiplied by the Background.
Add:  the texture is added to the Background.
Screen:  the texture is blended with the Background using a screen operation.
Difference:  the result is the difference between the texture and Background.
Overlay:  the texture is combined with the Background using an overlay function.

Input Opacity:   Popup menu,  Default: Normal.
Determines the method used for dealing with opacity/transparency.
All Opaque:  Use this option to render slightly faster when the input image is fully opaque with no transparency (alpha=1).
Normal:  Process opacity normally.
As Premult:  Process as if the image is already in premultiplied form (colors have been scaled by opacity). This option also renders slightly faster than Normal mode, but the results will also be in premultiplied form, which is sometimes less correct.

Output Opacity:   Popup menu,  Default: Copy From Input.
Determines the opacity/transparency of the result. This effect does not process the opacity (alpha channel) of its input but it can either copy the opacity from the input, or output a fully opaque result.
All Opaque:  Makes the result fully opaque with no transparency.
Copy From Input:  Copies the opacity/transparency from the current layer given to this effect.

See Also:

TextureFolded
TextureWeave
TexturePlasma
TextureNoiseEmboss
TextureSpots
TextureCells
TextureChromaSpiral
TextureMoire
CloudsColorSmooth
AutoPaint
Sapphire Plug-ins Introduction


© 2007, GenArts, Inc. All rights reserved.